Sunday, March 30, 2014

Running Docker container in oVirt

Overview

I recently wrote a new UI plugin in oVirt, that allows creating a VM that will run a Docker container inside it. This post shares the information about it, explains how to use it and what are the prerequisites.

What is it good for?

Well, Docker gives a very cool wrapping on top of linux containers. In addition, it also gives a public repository people can use! That makes it very easy to both create and consume container images that give different services, such as application servers, databases and many other services. Using the UI plugin to run that inside oVirt makes the job of deploying an existent service as easy as clicking a button (well... some steps are required first, but not too much steps :-) ).

Setting it up

In order to use the UI plugin you first need to fetch it from the samples-uiplugins git repository. The git repository is in git://gerrit.ovirt.org/samples-uiplugins. The plugin is currently being reviewed, so it is available at Docker-Plugin-Patch. Copy the plugin files to /usr/share/ovirt-engine/ui-plugins, so that you'll have the following directory structure:
  • docker.json
  • docker-resources/
  • docker-resources/plugin.html
  • docker-resources/icon_help.png
  • docker-resources/launch-docker-dialog.html
  • docker-resources/progress.gif

Then, you need to configure it. I usually do that using the docker.json file, although you can create a user-specific file as well. The relevant entries to configure are:
  1. allowedOrigins - that entry is used in order to pass messages between the UI plugin infrastructure and the plugin itself. I'll make it simple and just say you need to put the engine URL there, at the same way you access it with your browser (http://engine-server:port, or https://engine-server:port)
  2. apiEntryPoint - API entry point. Usually something like http(s)://engine-server:port/ovirt-engine/api
  3. dockerImages - Images you wish to be able to run. It can be either just an image name, or something more specific like user/image:label

Using the plugin


How does it work?

  • The UI plugin that allows the user to create a new oVirt VM, that runs a selected docker image running a specified command
  • It uses the cloud-init integration in order to pass the docker commands to the guest
  • docker image is downloaded from the public registry to the VM on first launch

Prerequisites

The plugin is based on creating a new oVirt VM from a template, passing cloud-init arguments that will configure and run the docker container.
Thus, in order to use it you need to have a Fedora image with docker service (with -r option to make containers start also after VM), cloud-init, and ovirt-guest-agent

It works only in cluster level 3.4 and above, as it requires persisting the cloud-init properties

Make sure the template you create have enough storage, as it might be required when downloading docker images. If you're interested in specific images then I recommend to pull them to the VM you create the template from, that way they'll be available, and won't require downloading the image when starting the container.

Plugin in action

1. You first login to the oVirt admin portal, and go the the VM main tab:


2. There you'll see the "Create Docker VM" button.
3. Press on it, and you'll see the following dialog:


4. Fill in the details:
  • Choose a DC
  • Choose a Cluster
  • Choose a Template that follows the prerequisites above
  • Fill in other VM properties
  • Fill in the Docker details (image, port mapping, and command). The command is mandatory only in case the image doesn't have an ENTRYPOINT.
  • Fill in the cloud-init details (I've decided to put only host name and SSH key, for the sake of simplicity).
5. Press OK


The VM is being created now. Once finished you can run it. After a few minutes, the IP address of it will appear in the admin portal, so you can either connect to it via SSH if you want (using the public SSH key you've passed), or just use the service it is supplying. In the screenshot I've created a Jboss instance, so I can just see that browsing results in a Test Page. Here is a screenshot showing the IP address:


And here is the result of browsing to this VM (we have mapped port 80 of the container to port 80 of the VM):


Pre-defined image in glance.ovirt.org

In order to ease the process of using this UI plugin, I've created an image you can import from the public oVirt Glance repository, "CentOS 6.5 64-Bit Docker".
You can import it using the guide available in my previous post (Importing Glance images as oVirt templates). It is based on the CentOS 6.5 cloud image. Make sure to create a virtual NIC in the template after importing, and also to set the relevant OS.

Note that I tested the plugin both using this template, and using a Fedora 19 template, installed from scratch. Using the Fedora 19 cloud image didn't work well for me, as the docker container got stuck on startup.

That's it! Start running containers in oVirt!

Monday, March 3, 2014

Importing Glance images as oVirt templates

Overview


In oVirt 3.4 we extended the integration with Glance, allowing to import Glance images of type QCOW2 or RAW as oVirt templates.
When importing an image you can do one of the following:
  • Import the image as a disk - useful when you want to take an image and attach it to a VM
  • Import the image as a template - useful when you would like to take existing image from Glance and use that in order to create several VMs

We also added a public Glance repository to be used by oVirt deployments. A reference to this repository is automatically added in 3.4, so you'll see it in the UI by default, under the name "ovirt-image-repository". You can either use it, or add your own Glance provider, using the steps outlined below.
The public repository currently contains a small amount of images, but we hope to add more images in the near future.

Setting it up

In this section I assume you already have an active Data-Center and Cluster. The DC level should be 3.4 and above for the import and VM creation to work.
Using Glance from within oVirt is pretty easy. If you plan to use the public repository, then all you have to do is:
  1. Go to the Storage main tab
  2. Storage Main Tab
  3. Select the "ovirt-image-repository" domain
  4. In the images sub-tab you'll see a list of available images
  5. Select an image
  6. Selecting an Image
  7. Press Import
  8. Select Data-Center, Storage domain and Quota (I'm not using Quota so it is disabled)
  9. Check the "import as template" checkbox
  10. Select a Cluster
  11. Press OK
  12. Import Image Dialog

Then you'll see that there is a new task running:
Task Progress

Once finished, a new template was created, with default configuration, name that starts with "GlanceTemplate", and description that contains the original image name:
Template Main Tab

You can rename it, and change different properties in it, and then use it as any other template, in order to create new VMs. Before use you should also change the OS type of the template, according to the selected image. The OS type determines whether you can use cloud-init on the VM or not. The current images are cloud-images, so you'll need to use the integration with cloud-init in order to be able to login/connect to the VM. In order to do that you need to change the OS type of the template, and in case of linux based OS you'll have the option to use cloud-init when adding VMs.

Adding your own Glance provider

In the steps above I used the public Glance repository, which exists by default in 3.4 deployments. You can also add a reference to your own Glance instance. If your instance doesn't allow anonymous read-only access, then you also have to configure the Keystone details in the oVirt engine, so let's do that first:
  1. Open a shell in the server where the engine is installed
  2. Enter the command:
  3. Restart the oVirt engine
  1. In the Tree on the list, select the External Providers branch
  2. Provider Main Tab
  3. Press Add
  4. Fill in the details
  5. If your provider requires authentication then select "requires authentication", and fill in the relevant credentials
  6. Press Test-Connection to check that the provided details are correct
  7. Press OK
  8. Provider Details
Now go the the storage main tab, there you'll see your new domain, and follow the steps from the same steps outlined above in order to import glance images.

Important notes:
  • As I wrote earlier, we only supports RAW and QCOW2 images
  • We currently don't support SSL communication with Glance
  • The import of these templates and the usage of them is only supported on DC Level 3.4 and above
  • The Fedora and CentOS images that exist in the public repo are cloud-images, and designed to be initialized using cloud-init. For more information about cloud-init integration in oVirt have a look at Cloud-Init integration and Persistent VM init data
  • As stated above, import as a template work only on Data-Centers with compatibility level that's 3.4 and above. Currently we also allow that on 3.3, but that's a bug, as the template will be created, but you won't be able to create VMs from it. This will be addressed in 3.4.1.

Sunday, March 2, 2014

Advanced integration with Red Hat Enterprise Virtualization Manager (RHEV-M)

At CloudOpen Europe 2013, in Edinburgh, I presented a talk about advanced integration with the oVirt engine.
I wrote a technical article covering that in the Red-Hat developer blog.
Feel free to have a look....
Advanced integration with RHEV-M- part 1
Advanced integration with RHEV-M- part 2

Enjoy!
Oved

Thursday, December 20, 2012

oVirt-Foreman UI Plugin

Overview


oVirt recently added a UI-Plugins infrastructure for the Administration Portal (webadmin). This infrastructure allows you to add different UI components to the portal, to show information from third party applications, as well as performing operations on them.
This blog post describes the infrastructure, and shows an example of a UI-plugin I wrote to work with Foreman. I'll also talk about the challenges that one might encounter while writing such a plugin, and how I tackled them.

Useful links:


Thankx to:
  • Vojtech Szocs - the one who wrote the UI plugin infrastructure, and helped me a lot with the oVirt side of the plugin
  • Ohad Levy and Joseph Magen - Foreman guys that helped me a lot in the Foreman side of the plugin


oVirt UI-Plugins Infrastructure


Looking at the oVirt Webadmin UI, there are several main UI components:
  • Main Tabs - for main entities such as Data-Centers, Clusters, Hosts, VMs and more. Each main tab shows a grid with entities of that type.
  • Action buttons and context menu actions - operations can be performed on each entity by either using action buttons, or context menu actions.
  • Sub-Tabs - when selecting an entity in the main tab, sub-tabs are opened in the lower part of the screen, allowing you to see details about it, in different domains of interest, and performing actions related to this domain.

The UI-Plugins infrastructure allows you to add UI components from each of these types, and providing you with a set of events to act upon when certain object(s) are selected.

UI-plugins are designed to be written in javascript, using an API provided by the infrastructure.

The API contains the following methods:
  • ready - indicates that the plugin is ready for initialization
  • register - registers plugin event handler functions for later invocation
  • configObject - returns the configuration object associated with the plugin
  • addMainTab - dynamically adds a new main tab
  • addSubTab - dynamically adds a new sub-tab
  • addMainTabActionButton - dynamically adds a new main tab action button + context menu item
  • showDialog - opens a new dialog with content provided from given URL
  • setTabContentUrl - dynamically changes the URL associated with a sub-tab
  • setTabAccessible - dynamically shows/hides a sub-tab
  • loginUserName - returns the logged-in user name
  • loginUserId - returns the logged-in user ID

And it supports the following events:
  • UiInit - code that runs upon plugin initialization
  • UserLogin - indicates that the user logged in
  • UserLogout - indicates that the user logged out
  • RestApiSessionAcquired - when logging in, the plugins infrastructure also logs-in the oVirt engine REST API, keeping a session ID alive for the plugin lifetime, for use in its different components
  • DataCenterSelectionChange - indicates that the selection has changed in the Data-Centers main-tab
  • ClusterSelectionChange - indicates that the selection has changed in the Clusters main-tab
  • DiskSelectionChange - indicates that the selection has changed in the Disks main tab
  • HostSelectionChange - indicates that the selection has changed in the Hosts main-tab
  • StorageSelectionChange - indicates that the selection has changed in the Storage main-tab
  • DataCenterSelectionChange - indicates that the selection has changed in the Data-Center main-tab
  • TemplateSelectionChange - indicates that the selection has changed in the Templates main-tab
  • VirtualMachineSelectionChange - indicates that the selection has changed in the VMs main-tab

Each plugin has a JSON-format configuration file, that contains different properties such as:
  • name - unique plugin name
  • url - URL of plugin host page that invokes the plugin code
  • config - key-value pairs for use in the plugin code
  • resourcePath - path where all the different plugin resource files are located in the server

oVirt-Foreman UI-Plugin

The purpose of this plugin is to allow administrators to see details on Foreman related entities (such as VMs). Currently, it doesn't allow you to perform operations on these entities.
the plugin requires two main components: the UI plugin itself, and a "Foreman plugin" (a.k.a. "Foreman engine") that will serve the UI-plugin requests, and show the response in layout and style that is more proper for UI components embedded in Webadmin. In thie section I'll describe the oVirt-Foreman UI plugin, some difficulties I encountered while working on that, and some approaches to solve them. Also, the plugin required two main components: the UI plugin itself, and a Foreman "plugin" (a.k.a. Foreman engine) that will serve the UI-plugin requests, and show them in a way that is more proper for UI components embedded in another application.

Same origin policy

When developing a new oVirt UI-plugin you must be aware of the Same origin policy concept. This concept is a security concept for browser-side programming languages such as JavaScript, that permits scripts running on pages from the same site to access each others properties and methods, while restricting access to methods and properties across pages on different sites. In simple words, one JavaScript code that originates from one end point (http(s)://server1:port1) cannot access another endpoint (another endpoint means different server name / port / secured behaviour). See Same Origin Policy wikipedia page for more information on that. Several possible solutions for that:

Using JSONP


JSONP, JSON with padding, provides a method to request JSON data from a server in a different origin. If your plugin just need to read JSON data, and create UI components according to it, then JSONP might be a good solution for you.

Pros:
  • easy to use if that's what you need

Cons:
  • only supports getting JSON data via HTTP GET
  • requires server-side support for JSONP
  • client code should be changed to work with JSONP

Assuming you have the following callback defined:


Using the following jquery method:


Will result in the following response:


Which will call the callback, with the JSON data, even if the URL is in a different domain.

Using CORS - Cross Origin Resource Sharing


CORS is a mechanism that allows a web page to make XMLHttpRequests to another domain. I won't give here more details about that. See the wiki page on that for more information.

Pros:
  • supports operations other than HTTP GET on JSON

Cons:
  • requires both browser and target server-side support


Using Apache mod-proxy (or mod-ssl)


One can define a proxy on the oVirt engine server, so that requests to "http://server1:port/data" will get the data from "http://different-server:port/data". That way, in the browser point of view, both origins are identical, thus not violating the same origin policy.

Pros:
  • no changes needed in the client code
  • no browser support needed

Cons:
  • using a proxy does have some overhead
  • requires special configuration at the originating server-side

In the oVirt-Foreman plugin I decided to go with the third approach. At start I planned to use the JSONP support, but that wasn't enough for what I wanted the plugin to do. The benefit of starting to work with JSONP was that I added Foreman server the ability to support that, if configured to do so (see Foreman-JSONP JIRA Issue and Foreman-JSONP support patch for more details on that).
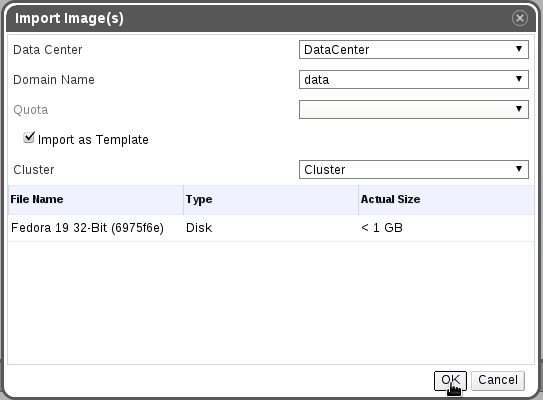
Some Screenshots

Before going into the technical details even more, let's see some screenshots of the integration.

(There isn't much traffic in my environment, so graphs/details are not so realistic like a real environment).

The "Foreman Dashboard" main tab:
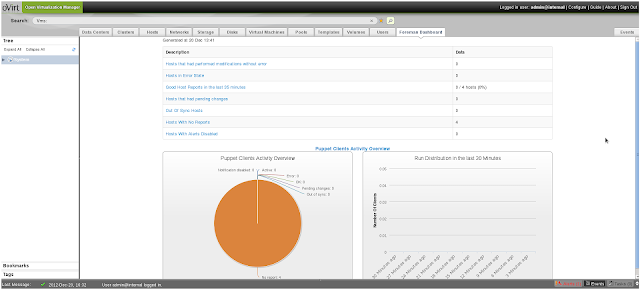
Foreman Dashboard


The "Foreman Details" as a VM sub-tab:
Foreman Details


The "Foreman Graphs" as a VM sub-tab:
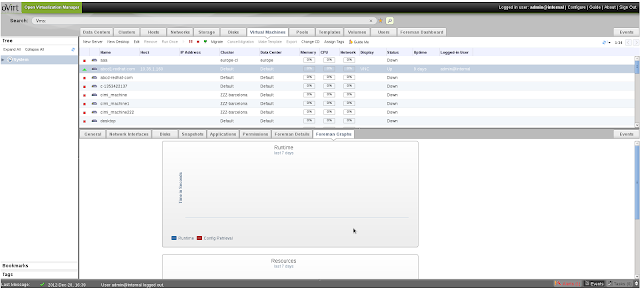
Foreman Graphs


Foreman UI-Plugin

The purpose of this plugin is to allow administrators to see details on Foreman related entities (such as VMs). Currently, it doesn't allow you to perform operations on these entities.
From the oVirt side, the source code of the UI-plugin is very simple, containing one HTML file, and one configuration file. However, another Foreman-side plugin needed to be written, to adjust the different layout and style to Webadmin, and support some specific operations in the Foreman side.

oVirt side


foreman.json plugin configuration file

The foreman.json configuration file is a simple one, containing mainly different foreman-related URLs that the plugin works with, and some UI-related properties (labels, window dimensions and etc.).

The UI Plugin infrastructure allows you to override the config section, by putting a file in /etc/ovirt-engine/ui-plugins with the custom values (note that custom config files should follow -config.json naming convention, e.g. /etc/ovirt-engine/ui-plugins/foreman-config.json). For example, if someone wants the plugin to show the different labels in a different language, then it can create another JSON file, with a config section that change the values of the labels entries.


start.html file

This file is the host page that invokes the plugin. The heart of this file is the register section. In this section, we define the different event handlers (see supported events above). In this plugin I used the following events:
  • UiInit - code that runs upon plugin initialization. In this case the UiInit event adds all the different UI components:
    1. Foreman Dashboard main-tab
    2. VM - Foreman Details sub-tab
    3. VM - Foreman Graphs sub-tab
  • RestApiSessionAcquired - when this event is triggered, we know that the user already logged in, and a REST session was created. We use this session ID in order to pass it to Foreman, and auto-login to it
  • VirtualMachineSelectionChange - VM selection change. We test whether one VM was selected, and if so, we search if it exists as a Host in Foreman (by testing that it has either the same UUID, or name). If so, we set the proper URLs and show both sub-tabs. If more than one VM is selected, or the VM doesn't exist as a Host in Foreman, we hide the sub-tabs
  • UserLogout - we logout from Foreman as well


Some helper functions I used that worth showing are setAccessibleVmForemanSubTabs that either shows or hides the VM Foreman sub-tabs:

and showVmForemanSubTabs, that sets the URLs of the sub-tabs, and shows them:

Foreman side

Foreman is written on Ruby on Rails, and it also has a new infrastructure for plugins (also called "engines"). In the next sections I'll describe the tree structure, and show the main files I added in the foreman_ovirt plugin.

Directory Structure

Ruby on rails works in the MVC (Model-View-Controller model), and is of the following structure:
  • app/models
  • app/views
  • app/controllers
  • config/routes.rb - file defining mapping between URL paths and resources
  • config/initializers - initialization code
  • lib - initialization code + helper files


A general layout file is located in 'app/views/layouts/application_ovirt.html.erb', and it controls all the different controllers in the foreman_ovirt plugin, using the following helper in the controllers:


Currently, the creation of the authentication source is done automatically for all the oVirt compute resources you have defined in Foreman, so you don't really need to manage this resource by yourself.

The Dashboard controller uses the parent dashboard controller, only with a different layout:

The hosts controller, also uses the parent hosts controller to supports show and show_graphs operations, also with a different layout:


The config/routes.rb, contains the mapping between URL paths and the resources, contains the following entries (see comments for details on each route):


oVirt-Foreman Authentication and Authorization

I created a new oVirt authentication source model, that handles the authentication part. When Foreman starts, it creates a new authentication source for each oVirt engine that is defined as a compute resource in Foreman, allowing this oVirt engine to use the Foreman integration.
Once a user logs in to the oVirt engine for the first time, and the authentication succeeds, it is automatically added as a new User in Foreman, and it is also granted the required role to see the oVirt-relevant views. In config/initializers/ovirt_setup.rb you can see the creation of the authentication sources, and the relevant oVirt role. In app/models/foreman_ovirt/user_extensions.rb you can see the code relevant for granting the logged-in user with this role, using a "after user save callbabk". This callback is registered using the following code that exists in lib/engine.rb initialization code:

Set up an oVirt-Foreman environment with the Plugin


In order to work with the plugin you need the following source code:
  1. Latest oVirt code (as the UI-Plugins infrastructure isn't released yet in an official build)
  2. Latest Foreman code (Some changes that are required for plugins to work were added recently) - also part of Foreman 1.1 RC2 and above

and you need to do the following steps:
  1. Add a file in the Foreman directory, under bundler.d, called foreman_ovirt.rb, containing:
  2. Run the following command in the Foreman root, to make sure the foreman_ovirt gem is installed and loaded:
  3. Before running Rails server, run:
    to make Foreman run in the "/foreman" root path, or if running through a service then add
    to /etc/sysconfig/foreman
  4. Put the files from the oVirt-Foreman UI-Plugin in "/usr/share/ovirt-engine/ui-plugins" (can be cloned from git://gerrit.ovirt.org/samples-uiplugins.git)
  5. Set up Apache mod_proxy in the oVirt-engine server as follows (change names and ports according to your environment), adding the following to /etc/httpd/conf/httpd.conf, in the section (note that if you already have oVirt proxy defined in /etc/httpd/conf.d/ovirt-engine.conf then just add it the foreman definitions below):
  6. Restart Foreman, the oVirt engine, and Apache
  7. Access webadmin through the URL you put in httpd.conf
  8. Now you can enjoy the Dashboard, and VM-Foreman sub-tabs (note that the sub-tabs will show only for VMs that exist as hosts in Foreman either via ID or Name)


Some notes
  • In installed oVirt environment you might already have webadmin and API proxy configured, so you'd only have to add the Foreman ones
  • Either both oVirt and Foreman should support SSL, or not... Otherwise they are considered different origins
  • To configure the SSL proxy you'd need mod_ssl configured, adding/changing the following entries in the relevant VirtualHost section in /etc/httpd/conf.d/ssl.conf:
  • The PEM file above is created by concatenating the certificate file (path defined in the SSLCertificateFile entry), and the key file (SSLCertificateKeyFile entry).
  • Only VMs with the same name as Foreman hosts, or oVirt VMs that were created using Foreman, will have the sub-tabs available, as the plugin searchs for Foreman hosts by name and ID (name might be equal, but the UUID will be equal only when creating the VM from Foreman)

Future Work

There is still much work to do, such as:
  1. Adding more views in the Foreman side, and more sub-tabs and tabs in the oVirt side. some examples:
    • Host Facts
    • Host Reports
  2. Add a Sync operation, to Sync the VMs with the Foreman Hosts, so that they wouldn't need to have the same name
  3. Packaging:
    • the Foreman side is a GEM. Would be nice to make an RPM of it
    • the oVirt plugin should be made into a RPM as well
  4. Move some of the configuration made in foreman.json to /etc/ovirt-engine/ui-plugins/foreman-config.json file, as users should edit this one and not the main one

And many many more... ideas are welcome, and contributions are welcome as well!

Monday, November 12, 2012

Working with oVirt via EC2/CIMI APIs using Deltacloud

Overview

The oVirt engine is a large scale, centralized  virtualization management platform, which provides many Infrastructure as a Service (IaaS) capabilities. Every such capability is exposed via rich API, UI, CLI and SDK.

Motivation

More and more cloud providers start to support more standard and common APIs, such as EC2 and CIMI API. It is useful when working in heterogeneous virtualization environment, in which you have more than one cloud provider, or even when you already have scripts developed to use these APIs, and you would like to use them on top of a different cloud provider. Moreover, existing projects such as Aeolus, HEAT, Synaps and more, support (or plan to support) working with common API(s).

The Deltacloud project allows you to use oVirt (and other cloud providers) using a standard and common cloud APIs, that include EC2, CIMI and the Deltacloud API. This post will focus on EC2 and CIMI APIs, which are new additions to the Deltacloud server.

This blog post will show how you can use Deltacloud in order to perform basic operations via EC2/CIMI APIs, on top of the oVirt engine. This post is informative and technical, and it is directed for those who are interested in a solution for using oVirt via common cloud APIs.

Note that the examples in this blog post were run on oVirt engine 3.1and Deltacloud server version 1.0.4, both running on Fedora 17.

Installing and Running the Deltacloud server


Installing the Deltacloud server

The deltacloud server can be installed very easily, using the following commands (Useful for Deltacloud development environment):


Or just using the following command (In a Deltacloud deployment environment):


Running the Deltacloud server

In order to run the Deltacloud server, on top of oVirt, exposing all three APIs (EC2, CIMI and the Deltacloud API) use the following command:


Note that in this command we haven't set the details of the oVirt engine URL. You can do that by setting the API_PROVIDER environment variable. Each Deltacloud server request is in a specific oVirt Data-Center scope, so this variable must contain both the oVirt engine URL, and the oVirt Data-Center ID.

In order to get the available oVirt Data-Centers you can use the oVirt CLI, using the following commands:


Now, you can set the API_PROVIDER as follows:


And run the Deltacloud server as shown before.

Setting the API_PROVIDER only sets the default engine and Data-Center. If you want a specific request to use a different oVirt engine, or a different Data-Center, you can set the "X-Deltacloud-Provider" HTTP Header parameter in your request to a different oVirt engine+Data-Center, and the request scope will change accordingly.

Note that in Fedora, if you installed the deltacloud-core-all package, then you'll get a deltacloud service, that reads its configuration from /etc/sysconfig/deltacloud-core. The problem is, that you cannot configure there the APIs you would like deltacloud to expose, so for now the manual approach is the only way (unless you change the startup scripts to do that for you).

Examples

Now lets move to some examples on using EC2 and CIMI on top of oVirt

EC2 Examples

Note that some operations support passing more than one object to do the operation on, for example InstanceId.1=...&InstanceId.2=... and etc. Deltacloud currently doesn't support more than one object, so all examples contain only one such object.

Get oVirt Clusters (Get Availability Zones)


Request


Response


Get oVirt Templates (Get AMIs)


Request


Response


Create VM from Template in a Cluster (Run Instance created from AMI in an Availability Zone)


Request


Response


Notes:
  • IP Address will be accurate only if guest agent is installed
  • InstanceType is hardcoded as SERVER, as oVirt still doesn't have hardware configuration object (oVirt template contains both hardware and software configuration). Adding instance types is planned for oVirt 3.2.
  • Passing User-Data is supported, currently via oVirt hook that is installed on the oVirt host, but in the future the native VM payload will be supported by Deltacloud as well.


Get VM(s) (Describe Instances)


Request


Response


Start VM (Start Instances)


Request


Response


Note that Deltacloud doesn't query for the status of the object before running this action, so it is set to unknown (-1).

Stop VM (Stop Instances)


Request


Response


Note that Deltacloud doesn't query for the status of the object before running this action, so it is set to unknown (-1).

Delete VM (Terminate Instances)


Request


Response


Note that Deltacloud doesn't query for the status of the object before running this action, so it is set to unknown (-1).

CIMI Examples

The CIMI API is a REST-based API, supporting GET (retrieve objects/collections), POST (create new objects), and DELETE (delete objects). PUT (modifying objects) is currently not supported in Deltacloud.

Get oVirt Templates (Get Images)


Request
In the request we use the URI of the machine_images collection.


Response
The response is a collection of Machine Images. Note that according to the CIMI spec, the ID is the resource URI, the name is the GUID, and the description is the name.


Create VM (Create Machine)


Request
In the request we use the URI of the machines collection, using HTTP POST, and passing body that contains the new machine details.


Response


Get VM (Get Machine)


Request


Response


Note that the list of operations that one can do on a machine changes according to its status. Now that it is STOPPED, you can wither start or destroy it. When creating the machine (in the previous example), it was in PENDING status, so no operations were available.

Start VM (Start Machine)


Request
In the request we use the URI of the specific machine, followed by "start", with an action body.


Response
The response is just HTTP code 200, which means that a start action was triggered. One needs to go HTTP GET on the machine resource to monitor for its progress.

Stop VM (Stop Machine)


Request
In the request we use the URI of the specific machine, followed by "stop", with an action body.


Response
The response is just HTTP code 200, which means that a stop action was triggered. One needs to go HTTP GET on the machine resource to monitor for its progress.

Delete VM (Delete Machine)


Request
In the request we use the URI of the specific machine, using HTTP DELETE.


Response
The response is just HTTP code 200, which means that a delete action was triggered. One needs to go HTTP GET on the machines collection (or the machine itself), so see that it was indeed deleted.

Summary

The oVirt engine is a strong IaaS platform, and it is useful to use this platform using standard APIs, such as EC2 and CIMI. By using Deltacloud, supporting these APIs can be achieved very easily. There is still more work to be done to give better integration between Deltacloud and the oVirt engine, but the basics are there, allowing to use oVirt via standard APIs.